Get every document from paper to AutoCount, correctly.
Cygenix ScanLink reads PDF or image documents, lets you review the extracted data field by field, and then creates or updates the matching document in AutoCount. This guide walks the full daily workflow, screen by screen.
ScanLink 1.0.13 at a glance
Your phone now does much more, Sales Invoices get credit control, and everything released since 1.0.11 is included.
| New in 1.0.13 | What it does for you |
|---|---|
| Phone Home screen | This month's documents scanned, posted and waiting, estimated hours saved, and a "Needs your attention" list. |
| Notifications | The phone tells you when new documents are ready for review. |
| Approve from the list | Approve a fully matched document with one tap, without opening it. |
| Search, View original, Lookup | Find any pending document, see the original photo or PDF, look up customers, suppliers and items. |
| Multi-page photos | Photograph a long invoice page by page — it is sent as one document. |
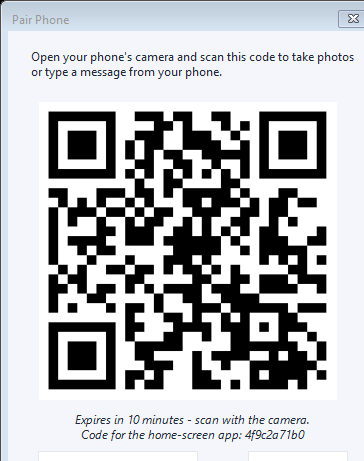
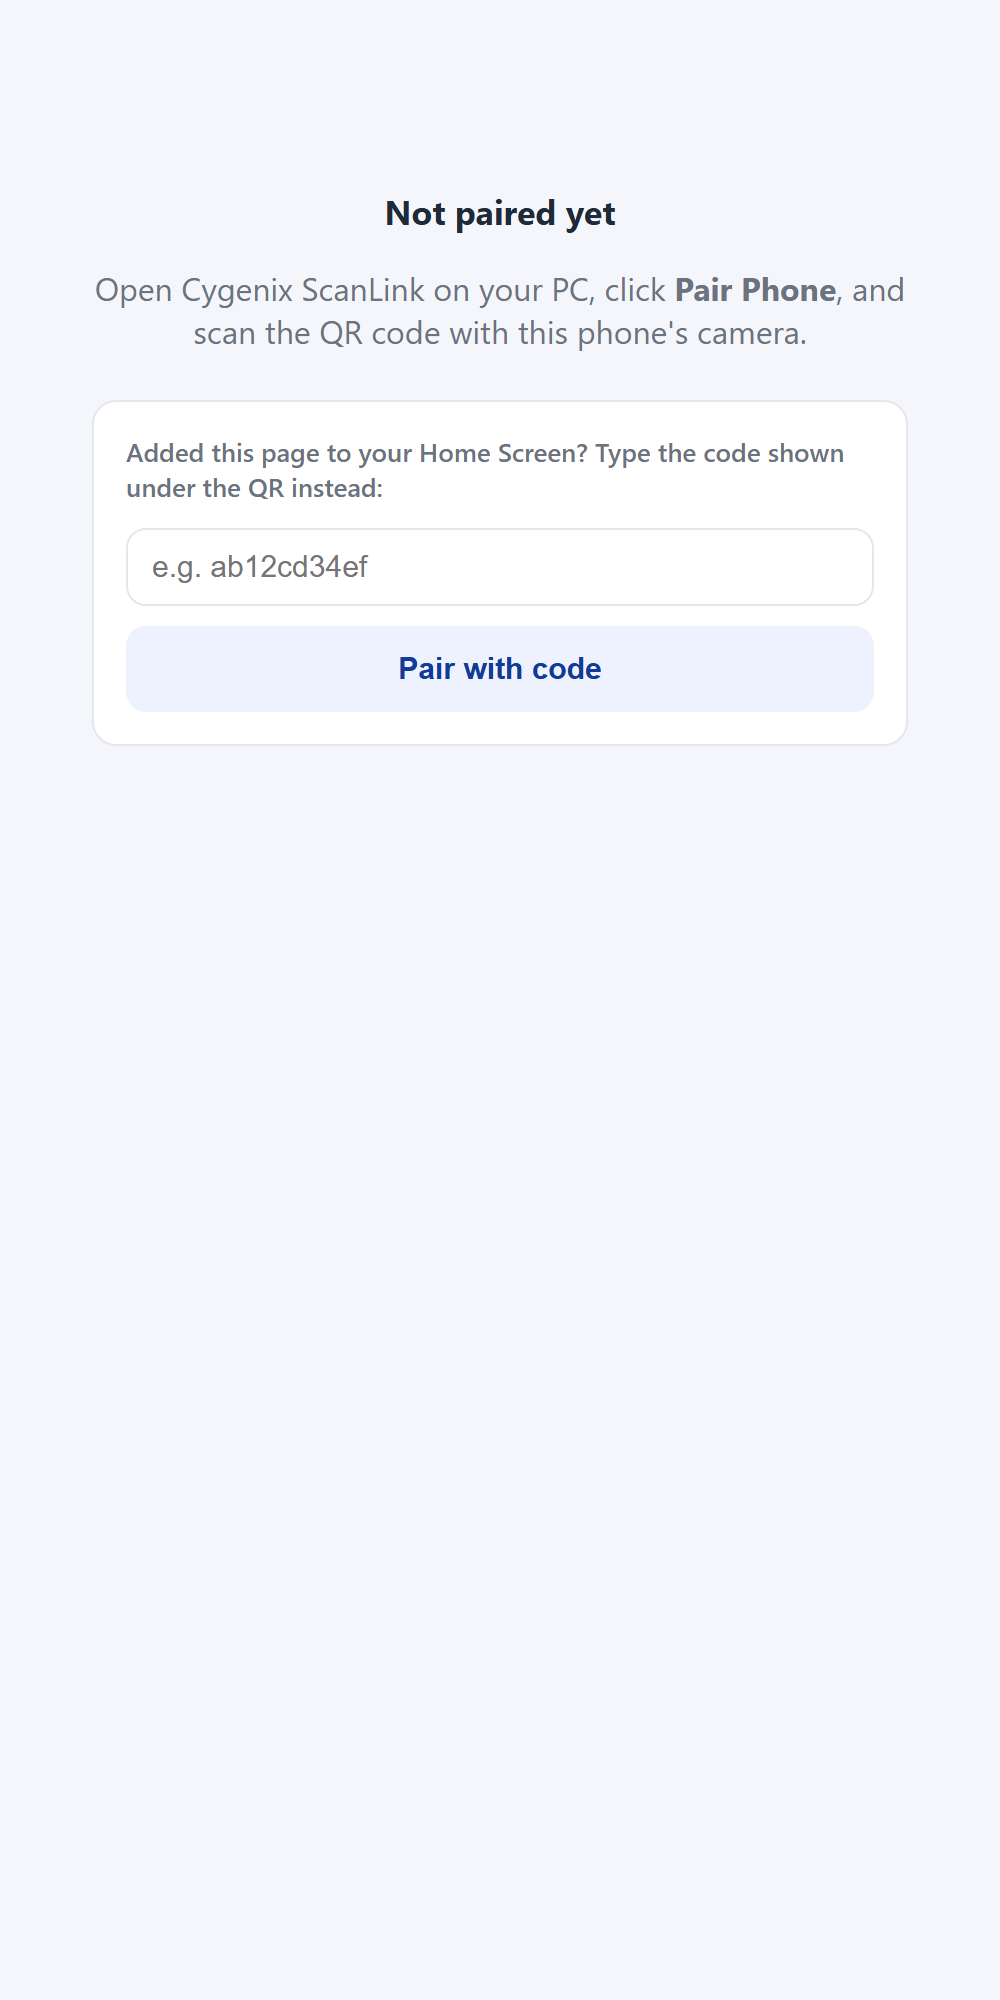
| iPhone pairing code | Pair a Home Screen app by typing a code shown on the PC. |
| Sales credit control | Warnings for credit limit, overdue limit and AutoCount's invoice block. |
| Added in 1.0.12 and earlier | What it does for you |
|---|---|
| Batch upload & Import Approved Now | Send many files at once; post every approved document with one click. |
| Split PDF | Cut one scanned batch into separate documents; blank sheets are skipped. |
| Several companies | Remember each client company and switch with Connect & Open. |
| Usage & Time Saved | A dashboard of documents processed and hours saved. |
| e-Invoice QR from PDF | QR codes are read from PDFs as well as photos. |
| Review warnings & Transfer | Duplicate, price change, PO match, self-billed; Delivery Order → Sales Invoice, GRN → Purchase Invoice. |
Home, Review and Lookup on your phone
Open the Cygenix Scan page on a phone paired to a PC running ScanLink 1.0.13 or later. Phones paired to an older version keep the original four tabs.
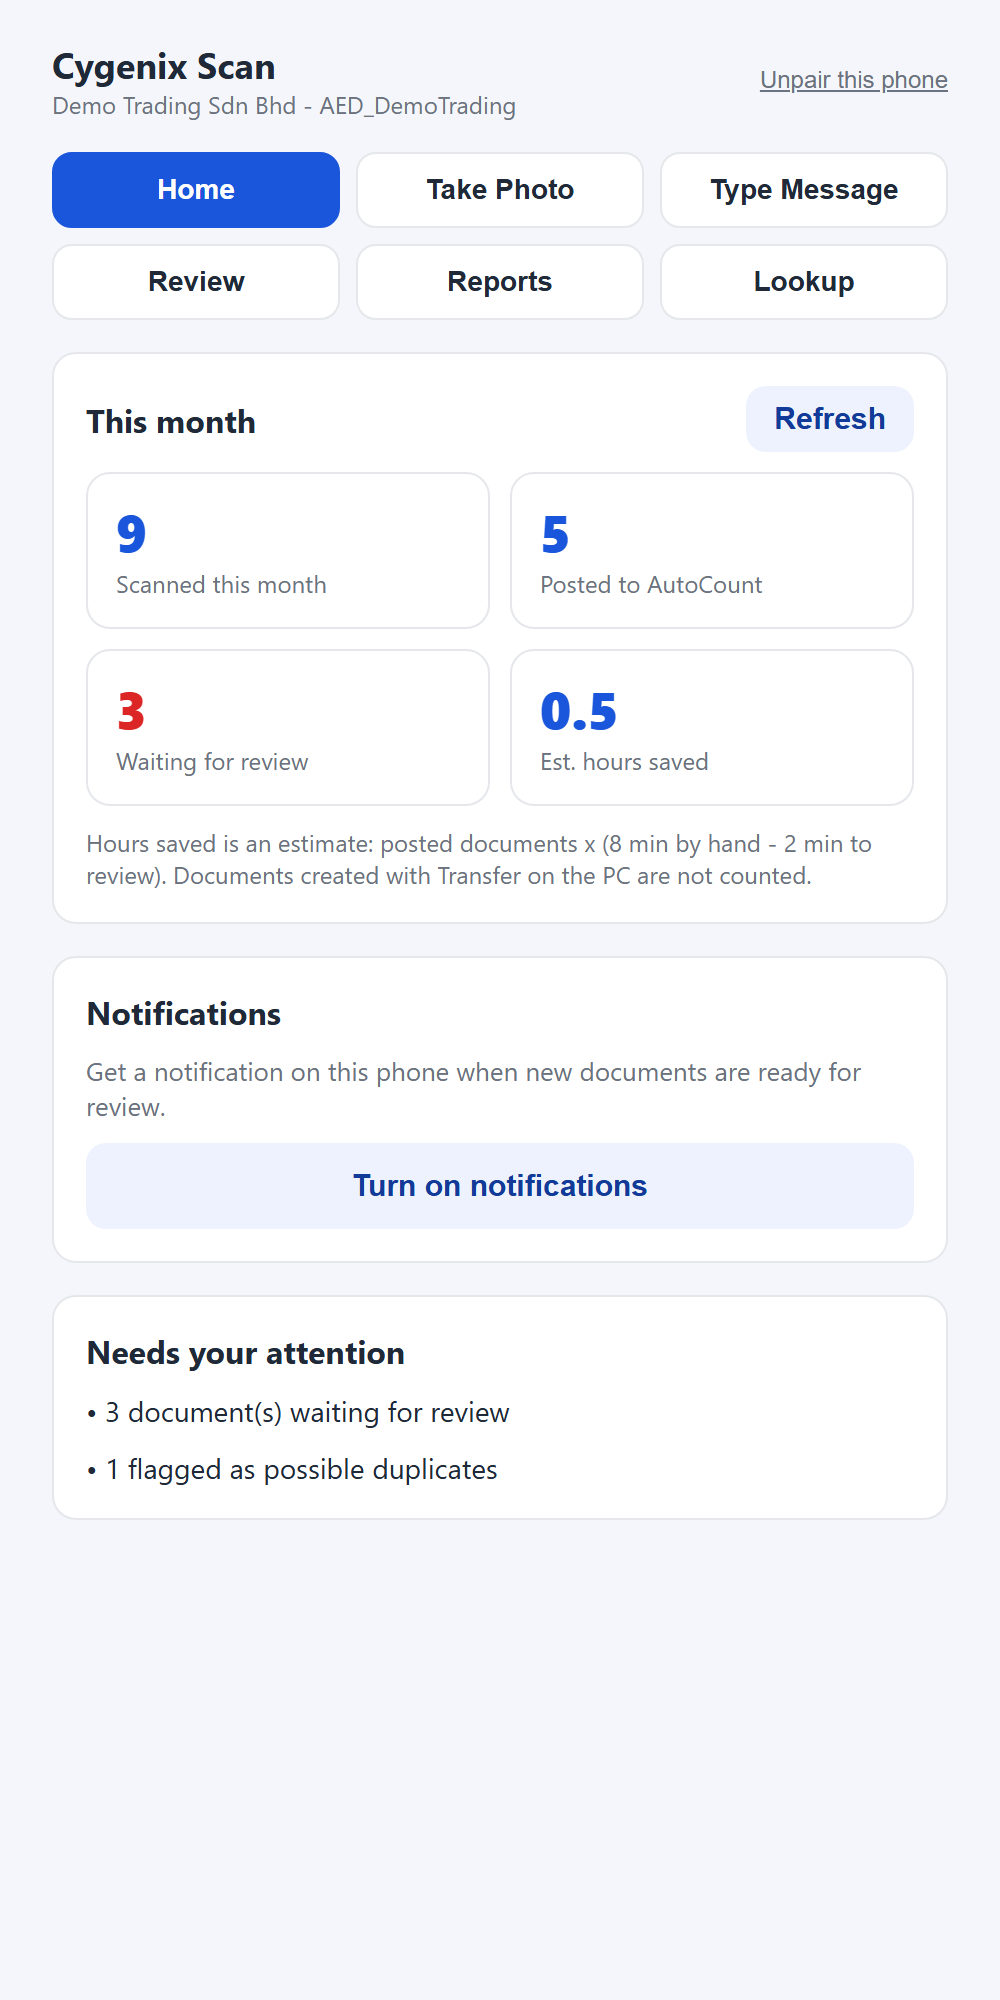
- 1HomeThis month's scanned, posted and waiting counts, estimated hours saved, and what needs your attention (waiting, possible duplicates, unreadable).
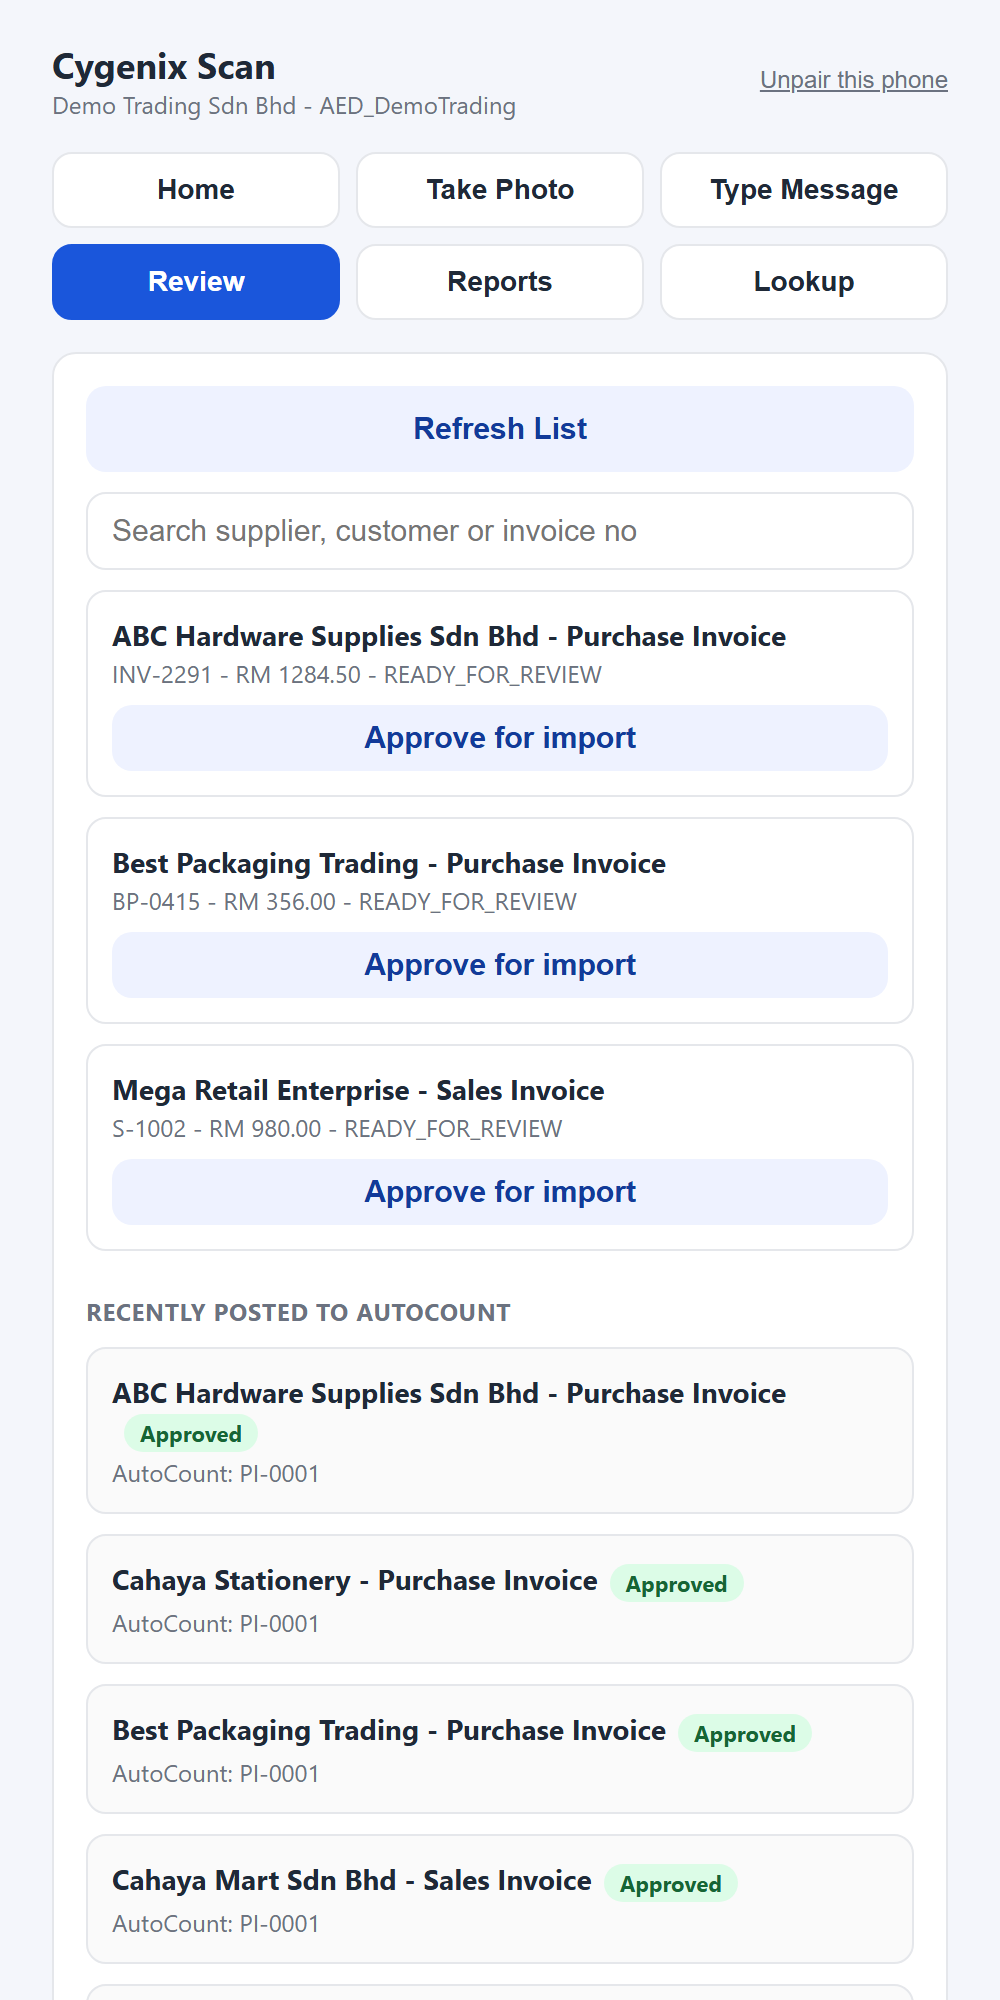
- 2SearchType a supplier, customer or invoice number in Review. It searches all your history, not only the newest documents.
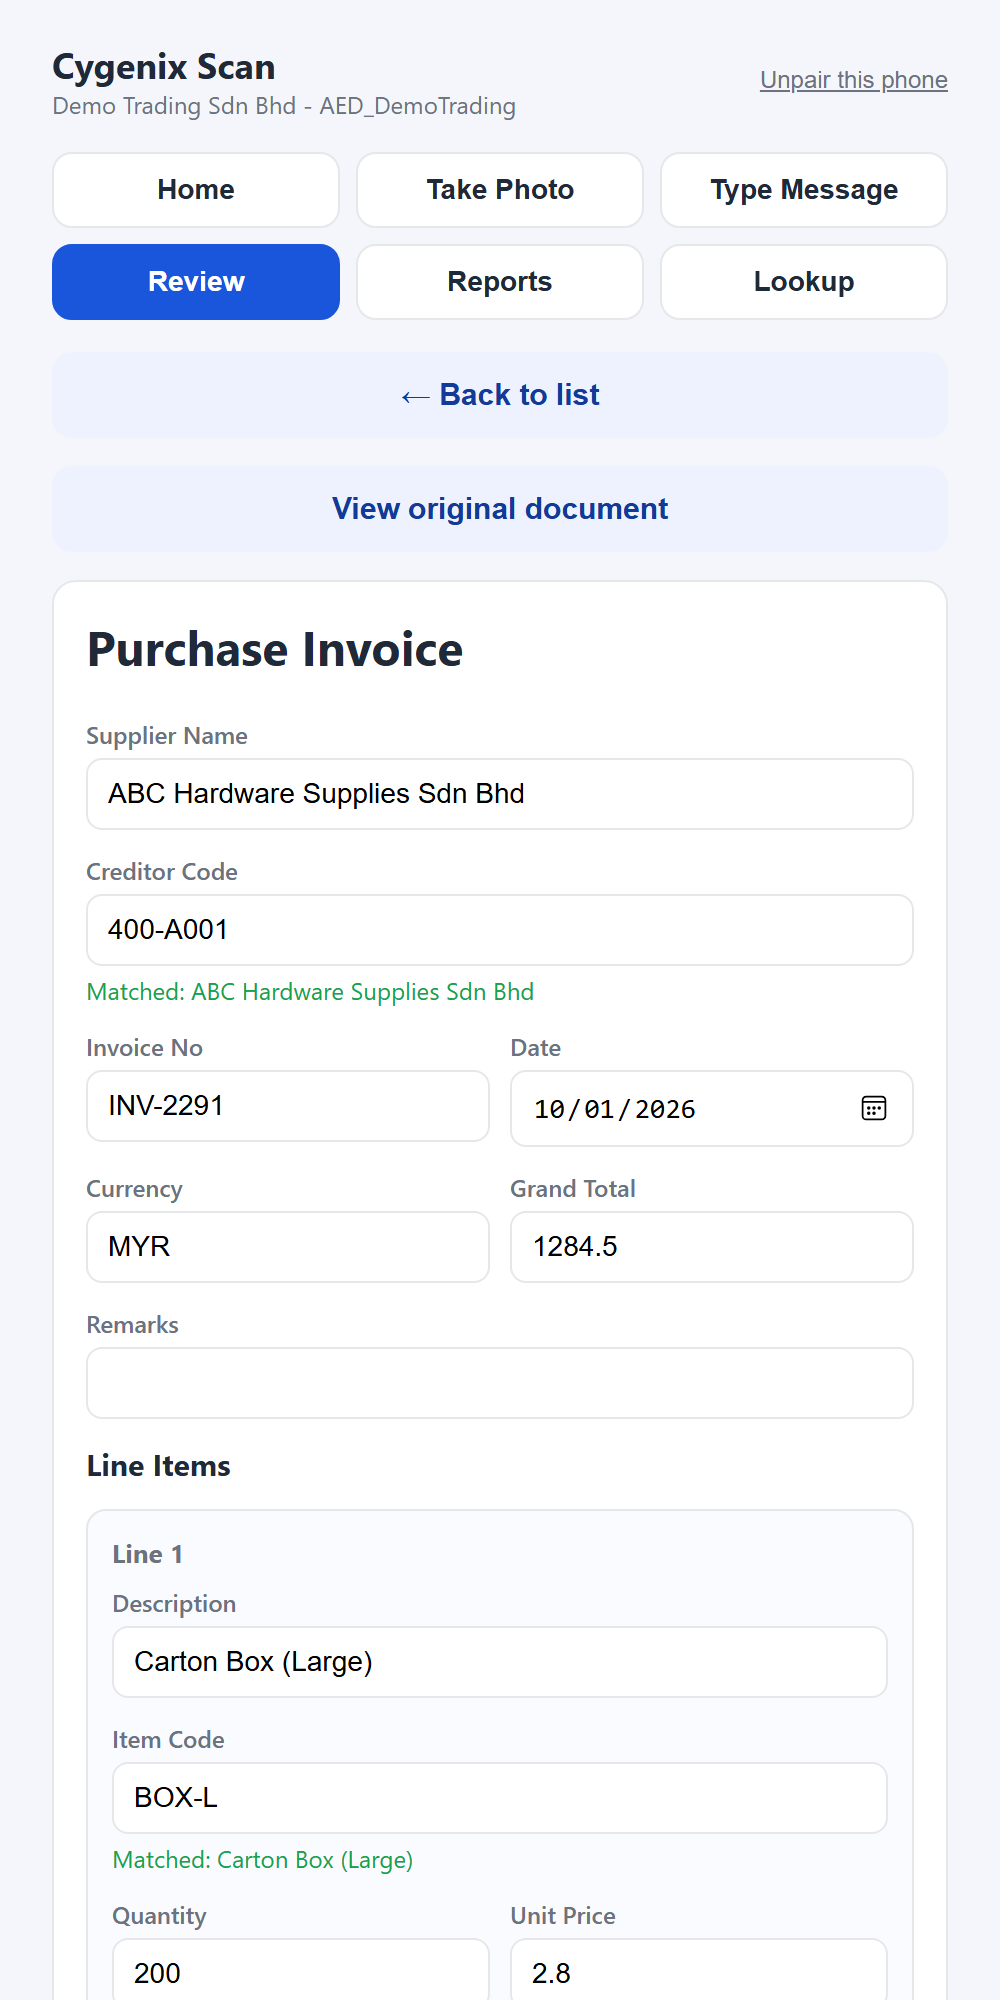
- 3View original documentOpens the uploaded photo or PDF so you can compare it with what the AI read.
- 4Save & Approve for ImportSaves your corrections and marks the document ready for the PC to import.
- 5Approve for importOn the list: approves a document exactly as read. Only allowed when the supplier or customer, every item and the total already match AutoCount; otherwise the full review opens so you can fix it first.
- 6Take Photo with several pagesTap + Add another page for each extra page; Upload sends them as one document.
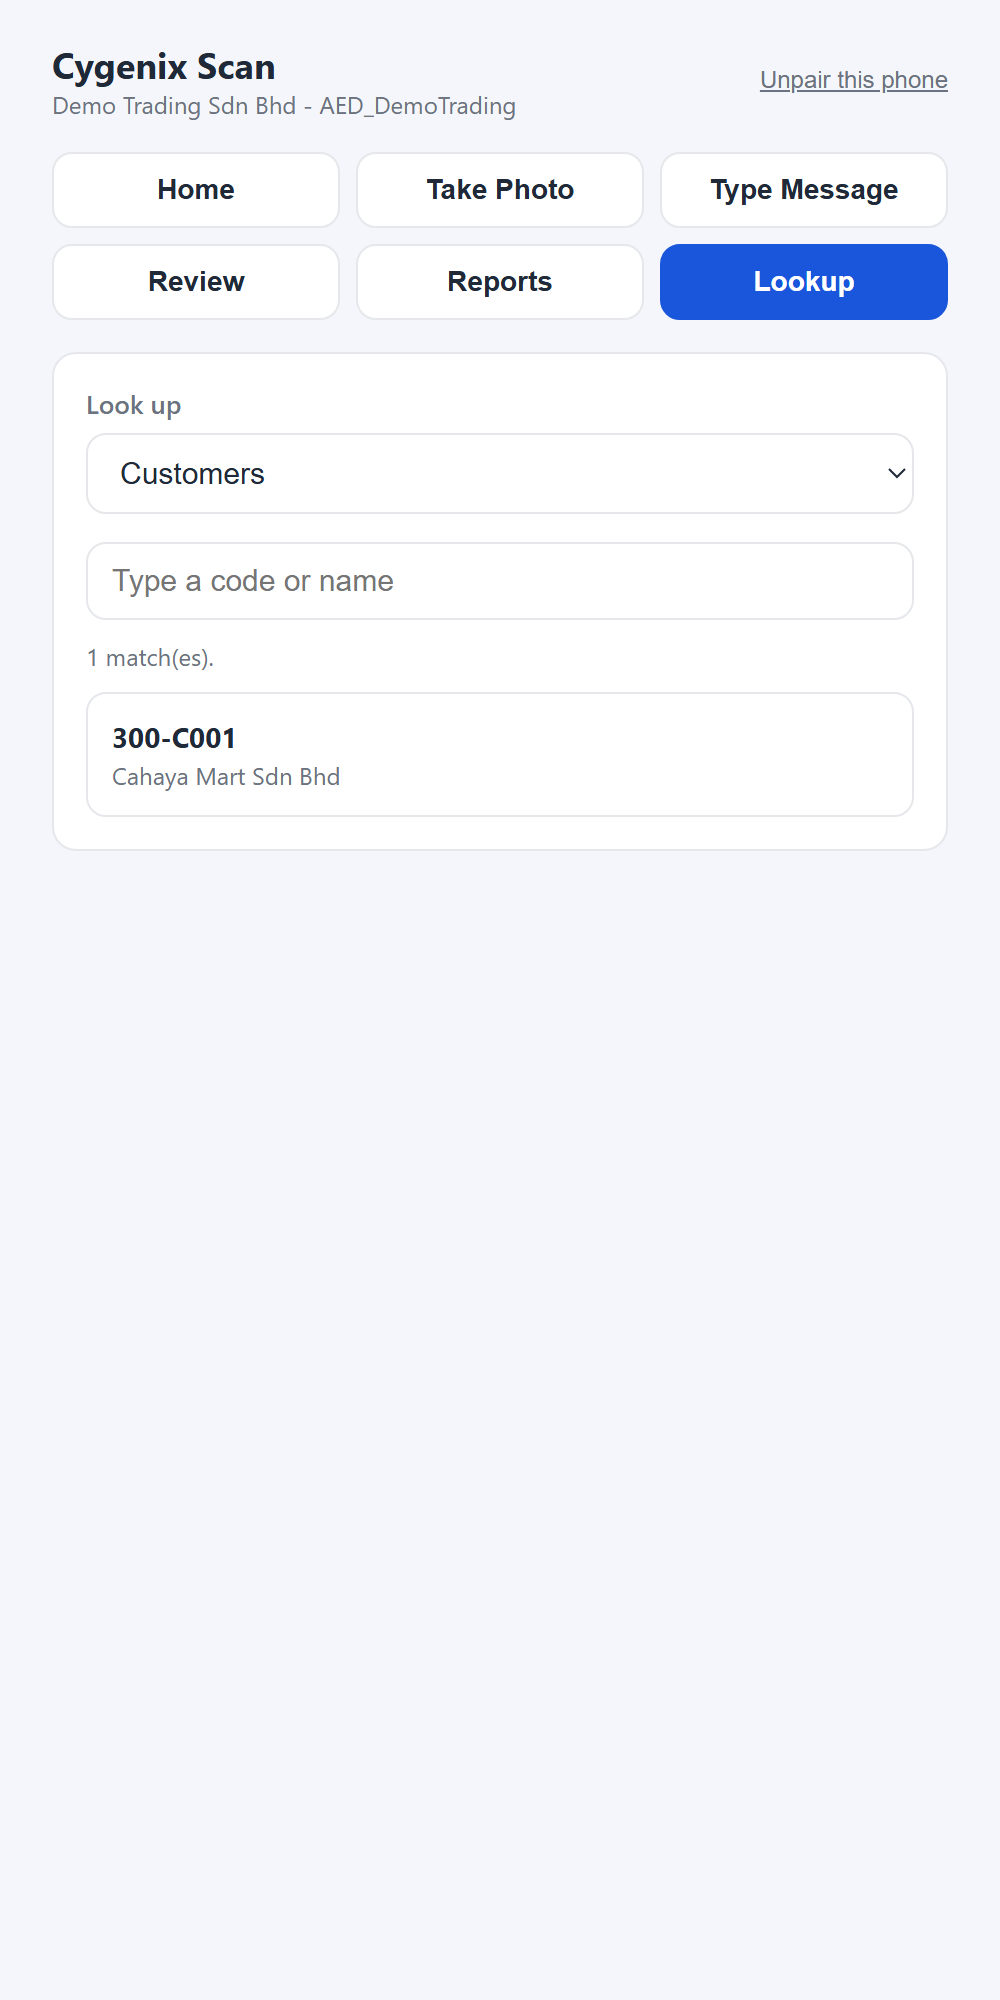
- 7LookupSearch customers, suppliers or items by code or name.
Notifications and the iPhone Home Screen
Get told when documents are ready for review, without keeping the page open.
- 1Turn them onOn Home tap Turn on notifications and allow them.
- 2Wait for a documentWithin about a minute of a document becoming ready for review the phone shows “1 document is ready for review”.
- 3Tap the notificationIt opens Cygenix Scan. Turn notifications off with the same button on Home.
Credit limit, overdue limit and customer block warnings
When you review a Sales Invoice, ScanLink checks the customer's AutoCount record and warns you in the status line. Warnings never block the import — you decide.
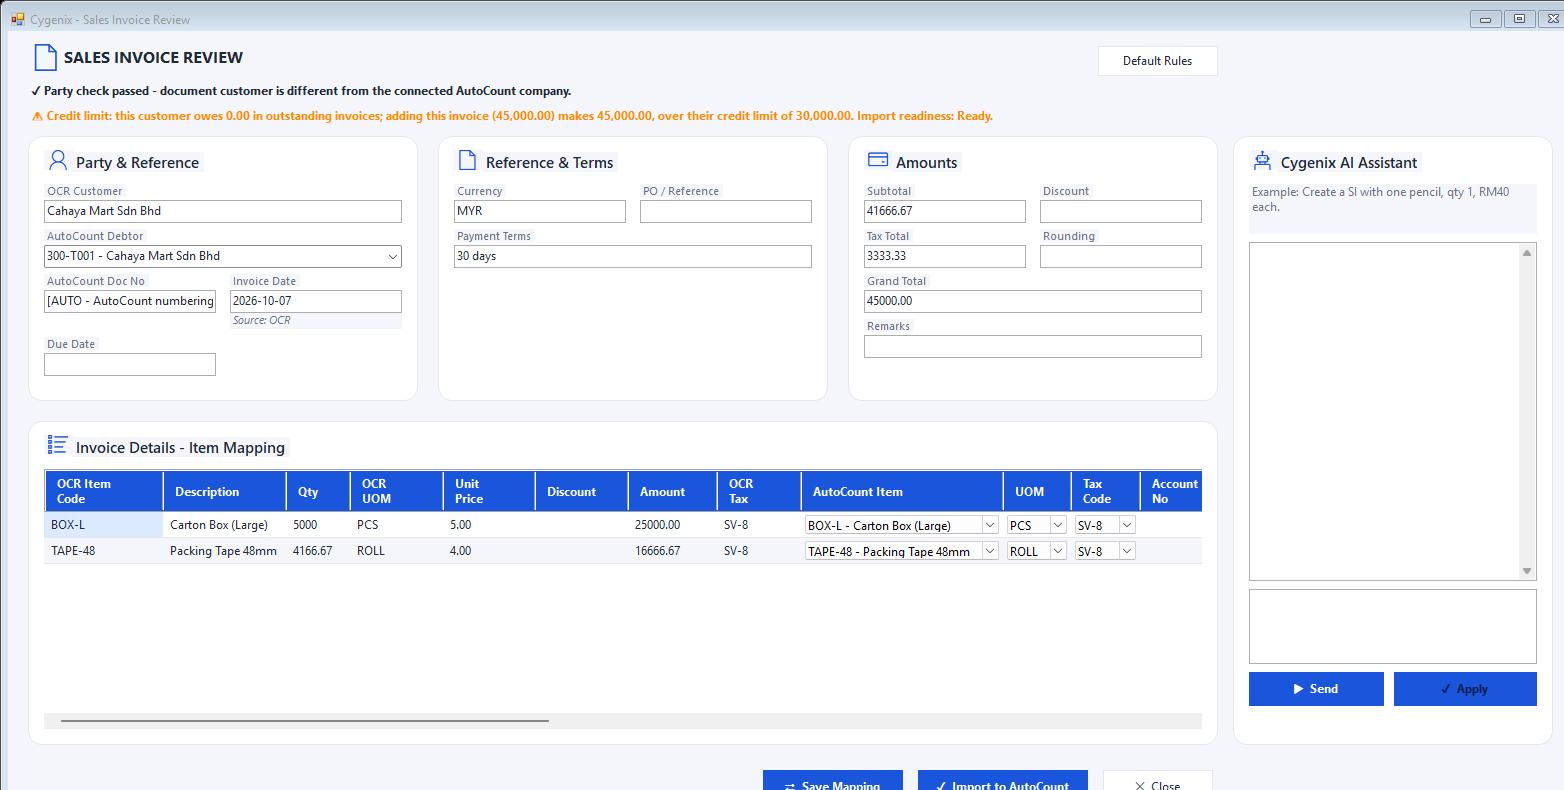
This invoice would take the customer over their AutoCount credit limit.
| Warning | When it appears |
|---|---|
| Credit limit | The customer's outstanding invoices and debit notes plus this invoice exceed their credit limit. If AutoCount is set not to allow exceeding it, the message says AutoCount may refuse the invoice. |
| Overdue limit | The customer already has more overdue than their overdue limit. |
| Customer flagged in AutoCount | A block or warning for invoices is set on the customer in AutoCount; its message is shown. |
Batch upload, Import Approved Now and Split PDF
Handle a pile of documents in a few clicks.
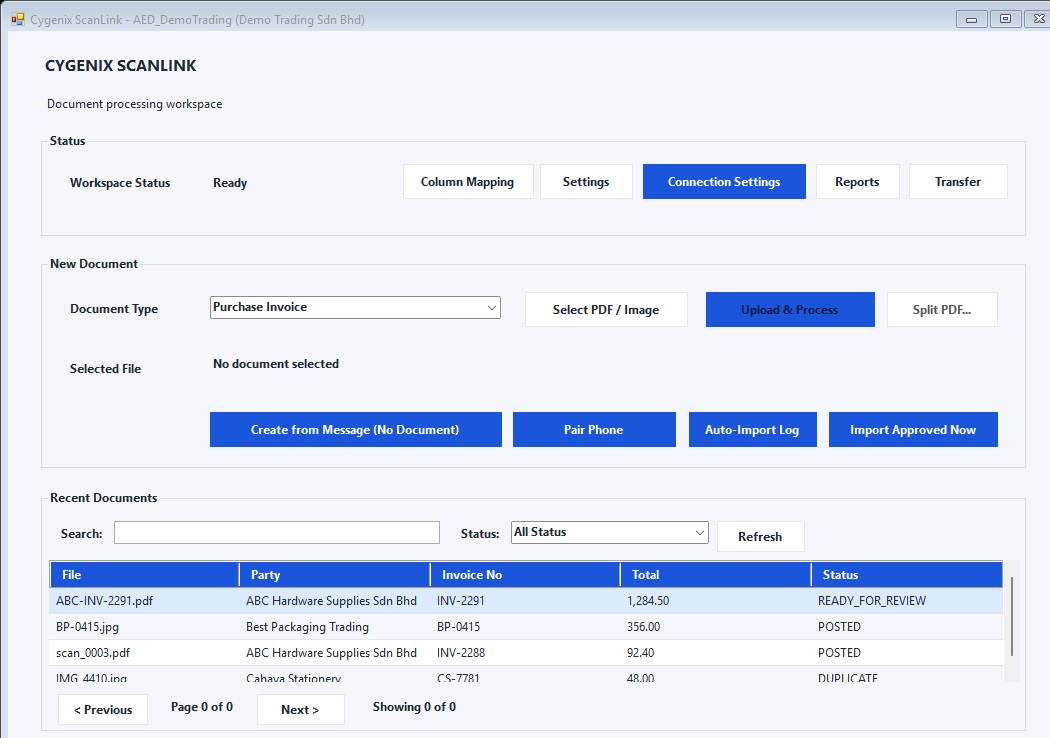
The workspace now has Split PDF… and Import Approved Now.
- 1Batch uploadSelect PDF / Image accepts many files. Upload & Process sends them one after another and gives one summary. Files that fail stay selected so you can retry without re-sending the good ones.
- 2Import Approved NowShows what will be imported, then posts every approved document. Anything that fails a check is skipped and left for you.
- 3Split PDFSelect a scanned batch PDF and click Split PDF…. Blank sheets are skipped; tick where each new document starts, or use “every N pages”. Then upload the pieces.
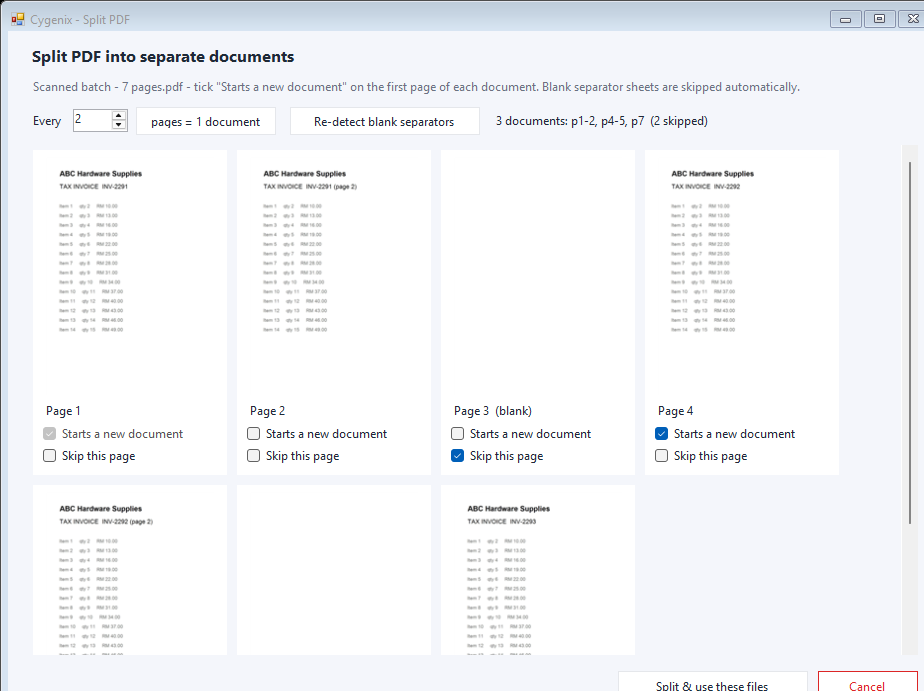
Blank separator sheets are skipped; each tick starts a new document.
Several companies and the scan folder
Look after many clients from one PC, each with its own scan folder.
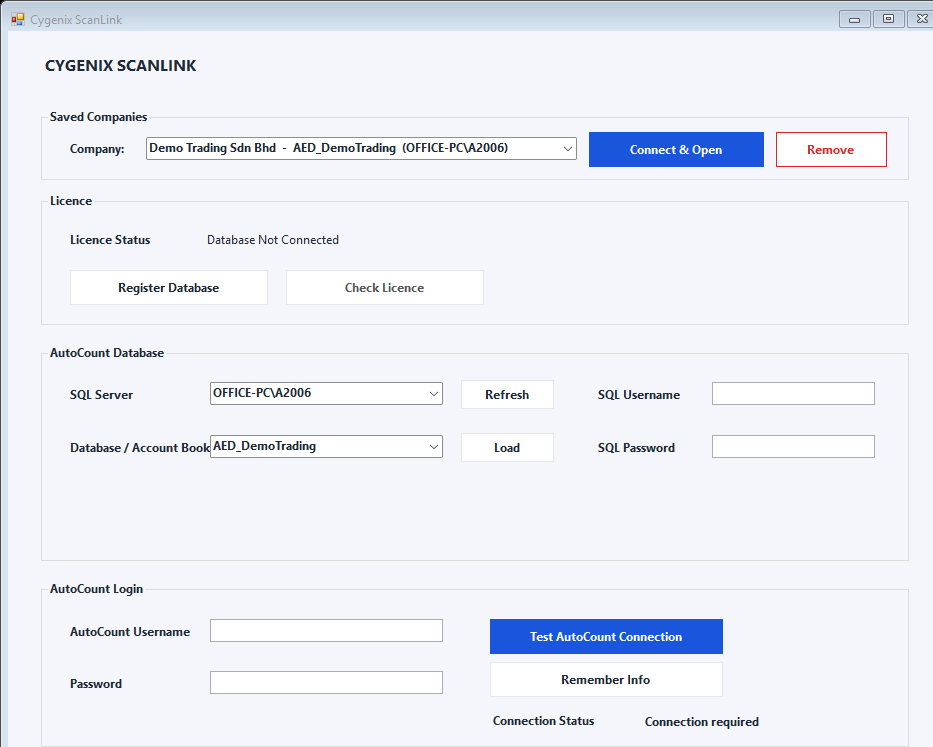
Saved Companies and Connect & Open.
- 1Remember each companyAfter connecting click Remember Info; the company is added to Saved Companies.
- 2Switch quicklyPick a company and click Connect & Open. ScanLink connects, checks the licence and opens its workspace.
- 3Scan Folder WatchIn Settings choose a folder and document type for each company. New scans are uploaded automatically and moved to
Processed(orErrors). - 4Automatic importOptionally tick Automatically import phone-approved documents to AutoCount. Only documents that pass every check are imported.
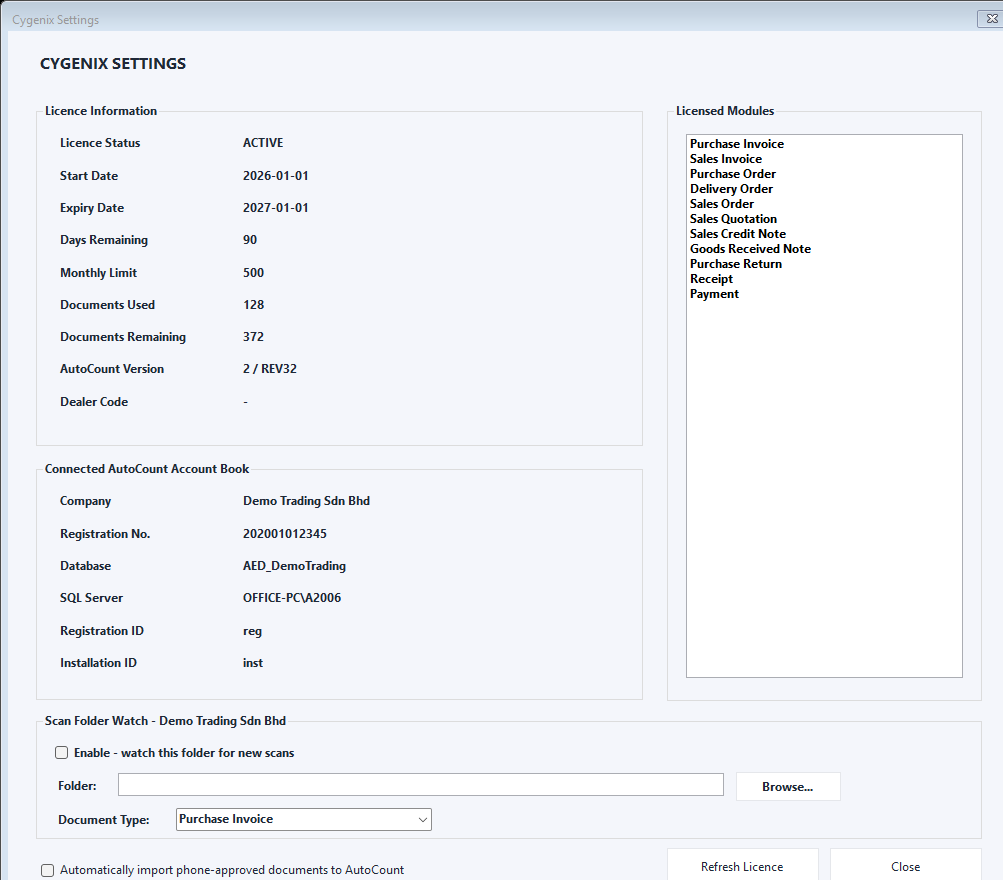
Licence information, modules, Scan Folder Watch and automatic import.
Usage & Time Saved and Transfer
See what ScanLink is saving you, and create the next document from an existing one.
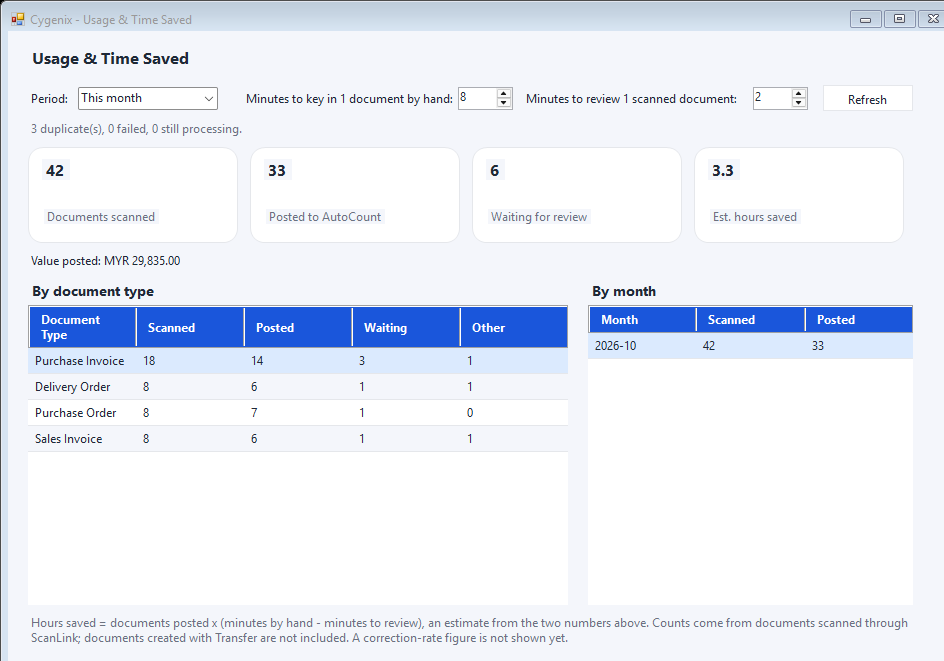
Documents scanned, posted, waiting, and estimated hours saved (sample figures).
- 1Usage & Time SavedOpen Reports → Usage & Time Saved. Hours saved = documents posted × (minutes by hand − minutes to review); both minute values are adjustable.
- 2TransferClick Transfer to create a Sales Invoice from a Delivery Order, or a Purchase Invoice from a Goods Received Note.
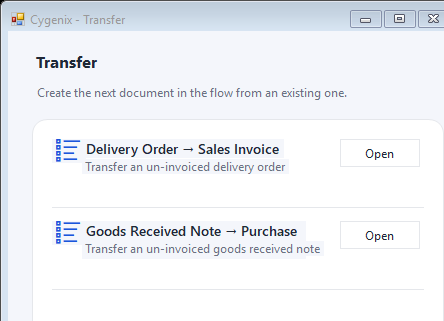
The Transfer screen.
Upgrading to ScanLink 1.0.13
Upgrading keeps your saved logins and settings.
- 1InstallRun
CygenixInstallLauncher.exefrom the new installer folder (not the .msi) and click Yes to remove the old version first. - 2Open the workspace onceConnect and open the Documents workspace. This tells the server the PC is on 1.0.13, which switches on the new phone features.
- 3Reload the phoneReload the Cygenix Scan page on each paired phone. If it says the pairing is out of date, tap Unpair and re-pair.
- 4OptionalTurn on notifications from Home. On iPhone add the page to the Home Screen first.
Daily workflow at a glance
Cygenix ScanLink reads a PDF or image document, lets you review what it extracted, and then creates or updates the matching document in AutoCount.
- 1Confirm connectionCheck that the correct AutoCount company is connected and the licence is active.
- 2Choose document typeSelect the AutoCount destination that matches the source document.
- 3Select the fileChoose the complete PDF or image that you want ScanLink to read.
- 4Upload and processWait until OCR processing finishes and the review screen opens.
- 5Review and mapCheck party, dates, references, totals, items, UOM, tax codes and AutoCount mappings.
- 6Create or updateCreate a new AutoCount document, or update the linked document only when intended.
Confirm AutoCount requirements
These checks are required before ScanLink can create or update documents in AutoCount. They are operating requirements, not installation instructions.

In AutoCount Module Setting, confirm that API is included and enabled.
- 1Check the AutoCount versionCygenix ScanLink supports AutoCount version 2.2 REV43 and above — earlier revisions are not supported.
- 2Confirm the API moduleIt must exist in AutoCount Module Setting and be enabled.
- 3Check your AutoCount user permissionsUse a user with permission to create or update the required document types.
- 4If API is missingContact your AutoCount dealer before using ScanLink.
Confirm the AutoCount connection
Before processing documents, make sure ScanLink is connected to the correct SQL database and AutoCount company.

A successful connection dialog shows the company, SQL server, database and AutoCount user. Technical identifiers are hidden in this guide.
- 1Check the company and databaseConfirm they are the ones you intend to use.
- 2Look at Connection StatusIt should show Connected.
- 3Test if unsureUse Test AutoCount Connection and wait for the success message.
- 4Stop if it's wrongDo not process documents when the wrong company database is shown.
Check that the licence is active
Select Check Licence whenever the status requires verification or when you need to confirm plan details.

The licence dialog shows status, licence type, compatible AutoCount version, enabled-module count and monthly document limit.
- 1Licence StatusMust show Active before normal processing.
- 2AutoCount versionConfirm the installed version is compatible with the licence information shown.
- 3Monthly Document LimitThe maximum allowance assigned to the plan.
- 4Modules EnabledIndicates how many document modules can be used.
Understand the main screen
The workspace is where you select documents, start OCR processing and open recent results.

Main ScanLink workspace showing Ready status, new-document controls and the Recent Documents list.
| Area | Purpose |
|---|---|
| Status | Shows whether the workspace is ready and opens Column Mapping, Settings and Connection Settings. |
| New Document | Choose the document type, select a PDF/image and start Upload & Process. |
| Recent Documents | Search, filter, refresh and reopen processed records by status. |
| Pair Phone | Links an authorised phone when the phone feature is included in the plan. |
Select the correct type and process
Choose the destination document type before selecting the source file. A wrong type can create the wrong AutoCount transaction. The Document Type list displays the modules enabled for your licence.

- 1Choose Document TypeSelect the exact destination, such as Purchase Invoice, Sales Invoice, Delivery Order, Receipt or Payment.
- 2Select PDF / ImageChoose one complete business document. Keep unrelated invoices in separate files.
- 3Select Upload & ProcessWait for processing to finish. Do not close ScanLink or disconnect from the internet.
- 4Open the review resultThe processed item appears in Recent Documents. Open a result marked READY_FOR_REVIEW to check it.
Pair an authorised phone
The phone feature lets an authorised user photograph a document, or type a document request, and send it into the ScanLink queue.

Select Pair Phone on the desktop connector. The QR code is temporary and is intentionally hidden in this guide.
- 1Select Pair PhoneOn the desktop workspace, select Pair Phone to generate a temporary QR code.
- 2Scan with the phone cameraOpen the phone camera and scan the code. Do not send the QR image to another person.
- 3Confirm the account bookOn the phone page, check that the displayed company/account book is correct.
- 4Regenerate if expiredThe code expires after the time shown. Use Generate New Code when a fresh pairing code is required.
Send a document photo to ScanLink
Use Take Photo when the source is a paper document, or an image already stored on the authorised phone.

Phone · Take Photo screen
- 1Select Take PhotoOpen the Take Photo tab and choose the correct document type.
- 2Take or choose photoCapture a sharp, complete image or choose an existing one.
- 3Select UploadThe document is sent into the connector queue.
- 4Continue on desktopReview the queued item before importing to AutoCount.
Create a draft from written instructions
Use Type Message when no source document is available and the authorised user wants to create a draft using clear written instructions.

Phone · Type Message screen
- 1Choose document typeSelect the intended AutoCount document.
- 2Describe the documentInclude party, items, quantity, price, currency and references.
- 3Create DraftThe draft is added to the connector queue.
Monitor the queue from the phone
The Review tab displays items waiting for review and documents recently posted to AutoCount.

Phone · Review screen
- 1READY_FOR_REVIEWThe item must still be checked in the desktop connector.
- 2Recently postedShows completed items and their AutoCount document numbers.
- 3Refresh ListRefresh to obtain the latest queue status.
Review licence usage and enabled modules
Settings shows the current licence period, document balance, connected account book and available document modules.

Settings screen. Registration and installation identifiers are hidden for security.
- 1Documents Used / RemainingHelp you monitor the monthly allowance.
- 2Licensed ModulesLists the document types currently available.
- 3Connected AutoCount Account BookConfirms which company and database are registered.
- 4Auto-import phone-approved documentsControls whether approved phone items can bypass the normal desktop import step.
Match OCR fields to AutoCount fields
Column Mapping controls where each extracted OCR value is placed in AutoCount. Review it carefully, especially after changing document type or database.

Purchase Invoice mapping example: Cygenix field, level, OCR field and destination AutoCount field.
- 1Confirm document type and databaseThe top of the screen should show the intended document type and AutoCount database.
- 2Review Master and Detail fieldsMaster fields apply to the document header; Detail fields apply to item rows.
- 3Use Auto Suggest carefullyAuto Suggest can propose mappings, but each proposed AutoCount field must still be checked.
- 4Save MappingSave only when the selected AutoCount fields are correct — incorrect mapping can place values in the wrong column.
Check the OCR result before posting
The review screen combines the extracted header, mapped items and the Cygenix AI Assistant. You must approve the final values.

Purchase Invoice Review example showing Party & Reference, Terms, Amounts, item mapping and AI Assistant.
| Review area | What to confirm |
|---|---|
| Party & Reference | Supplier/customer, AutoCount account, source document number and date. |
| Terms | Due date, PO/reference and payment terms. |
| Amounts | Currency, subtotal, discount, tax, rounding and grand total. |
| Item Mapping | Description, quantity, UOM, unit price, discount, amount, item, tax code, account, department, location and project. |
| AI Assistant | Use suggestions as assistance only. Review any applied change before posting. |
Update an existing AutoCount document safely
When the review is already linked to an AutoCount document, Update AutoCount modifies that existing transaction instead of creating a new one.

Confirmation dialog displayed before updating an existing AutoCount Purchase Invoice.
- 1Confirm the document numberMatch the linked AutoCount document number to the transaction you opened.
- 2Review every changed fieldHeader, amount and item fields, all of them.
- 3Check for conflictsMake sure no other user is editing the same transaction.
- 4Wrong document?If you intended to create a new document, select No and return to the workspace.
- 5Verify after updatingOpen the transaction in AutoCount and check the final result.
Supported document types
The exact modules available to you depend on the licence assigned to the connected company. Your screen may show fewer enabled items than this list.
Sales Documents
- Sales Invoice
- Delivery Order
- Sales Order
- Sales Quotation
- Sales Credit Note
Purchase Documents
- Purchase Invoice
- Purchase Order
- Goods Received Note
- Purchase Return
Finance Documents
- Receipt
- Payment
Check these fields every time
These checks prevent most account-selection, duplicate, tax, quantity and pricing mistakes — confirm all of them before creating or updating an AutoCount document.
Quick checks and safe support information
Most issues can be narrowed down before you contact your dealer — start with the checks below.
| Situation | What to check |
|---|---|
| Not connected | Internet access, correct SQL database, AutoCount login and the Test AutoCount Connection result. |
| Licence not active | Run Check Licence, confirm the registered database, contact the dealer if verification fails. |
| Module missing | Check Licensed Modules in Settings and confirm the subscription with the dealer. |
| OCR inaccurate | Use a clearer PDF/image, correct orientation, and manually verify the result. |
| Cannot post | Required fields, accounting period, user permissions, party/item mapping and tax/account codes. |
| Limit reached | Documents Remaining, plan allowance and top-up availability with the dealer. |
Send your dealer
- Company name and the AutoCount company/database name
- Connector version and selected document type
- A short description of what happened, and whether it affects one or all documents
- A screenshot of the error with passwords, keys and technical identifiers hidden
Never share
- SQL passwords
- AutoCount passwords
- Licence keys & dealer keys
- API keys
- Database fingerprints
- Registration or installation IDs